Focusrite Control: It’s the unsung hero of many a recording session, quietly powering up your audio interface and letting you sculpt your sound. This isn’t just some basic control panel; we’re talking about a powerful suite of tools that can transform your workflow, from initial tracking to final mixdown. Whether you’re a seasoned pro or just starting out, understanding Focusrite Control is key to unlocking the full potential of your Focusrite interface.
This guide dives deep into the software, covering everything from basic setup and troubleshooting to advanced routing and effects processing. We’ll explore the user interface, compare it to other audio interface software, and provide practical tips and tricks to help you get the most out of your recordings. Get ready to level up your audio game!
Focusrite Control Software Overview

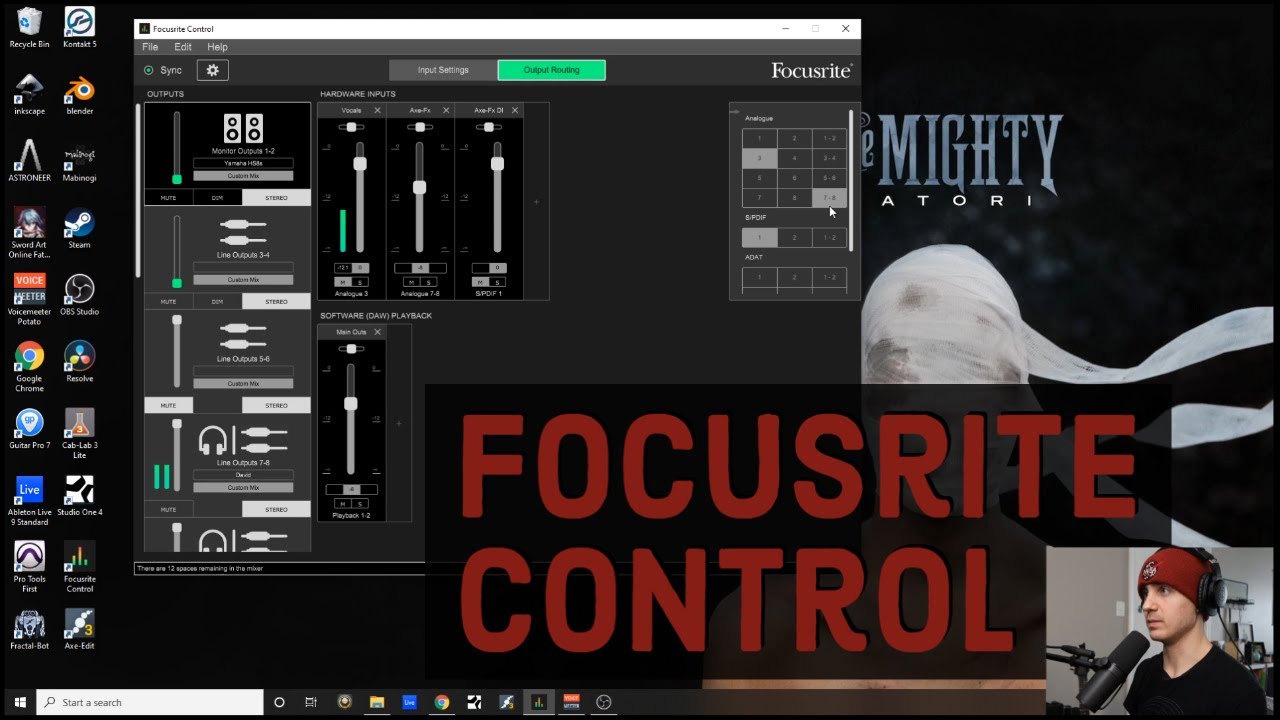
Focusrite Control is the essential software hub for managing your Focusrite audio interface. It provides a streamlined interface for controlling your audio interface’s settings, monitoring your inputs and outputs, and managing your audio routing. Think of it as your command center for getting the most out of your Focusrite hardware.Focusrite Control offers core functionalities that are vital for any serious audio production workflow.
It allows you to adjust input levels, monitor your signal paths, route audio to different outputs, and even control the headphone mix for multiple users. This allows for a smooth, efficient workflow, saving you valuable time in the studio. The software also provides access to advanced features like the Focusrite Control’s unique headphone cue mixes, allowing for detailed monitoring control.
It’s the glue that binds your hardware and software together for a seamless recording experience.
System Requirements for Optimal Performance
For optimal performance, Focusrite Control requires a reasonably modern computer system. While the exact specifications vary slightly depending on the Focusrite interface model, generally speaking, you’ll need a computer running Windows 10 (64-bit) or macOS 10.15 or later. A sufficient amount of RAM (at least 4GB, but 8GB is recommended) is crucial for handling multiple audio streams and plugins.
A fast processor (Intel Core i5 or AMD Ryzen 5 equivalent or better) will ensure smooth operation, and a stable internet connection is needed for updates and accessing certain online features. Failing to meet these minimum specifications might result in latency issues, crashes, or other performance problems. Think of it like trying to run a marathon in flip-flops – it might work, but it’s not ideal.
Focusrite Control Installation and Troubleshooting
Installing Focusrite Control is generally straightforward. Download the installer from the Focusrite website, ensuring you select the correct version for your operating system. Run the installer and follow the on-screen instructions. The process typically involves accepting the license agreement and choosing an installation location. After installation, connect your Focusrite interface to your computer, and the software should automatically recognize it.
If it doesn’t, check your computer’s device manager (Windows) or System Information (macOS) to ensure that the interface is properly installed and drivers are correctly loaded.Common issues include driver conflicts, incorrect routing settings, or connectivity problems. Driver conflicts can usually be resolved by uninstalling conflicting drivers before installing the Focusrite drivers. Incorrect routing settings can be fixed by carefully reviewing the routing configuration within the Focusrite Control software, making sure that signals are correctly routed to the desired inputs and outputs.
Connectivity problems are often caused by faulty cables or improperly seated connections; checking these components is always the first step in troubleshooting. If problems persist, the Focusrite support website offers comprehensive troubleshooting guides and FAQs, and their support team is readily available to assist.
Interface and User Experience: Focusrite Control
Focusrite Control’s interface is generally well-regarded for its clean and uncluttered design, making it relatively easy to navigate, even for beginners. However, its simplicity can sometimes feel limiting, especially when compared to more feature-rich competitors. The overall user experience is largely positive, but there’s room for improvement in terms of intuitiveness and customization.The software’s strengths lie in its straightforward layout and ease of access to core functions.
Finding the controls for gain, phantom power, and routing is quick and simple. The visual representation of the audio interface’s hardware is clear and informative, providing a good visual cue for users to understand their setup. The color scheme is consistent and pleasing to the eye, further contributing to a positive user experience.
User Interface Design Evaluation
Focusrite Control’s interface is primarily characterized by its minimalist approach. This design choice, while effective in its simplicity, lacks the depth and customization options found in competing software like Universal Audio’s UAD Console or Steinberg’s Cubase. For instance, the lack of customizable metering options and limited visual feedback on certain processes, such as latency compensation, can be a drawback for more advanced users.
While the simplicity is beneficial for beginners, experienced users may find it restrictive. The main window clearly displays the connected interfaces and their channels, allowing for quick adjustments. However, accessing more advanced settings often requires navigating through several menus, which can be cumbersome.
Comparison with Competing Software
Compared to Universal Audio’s UAD Console, Focusrite Control lacks the extensive plugin integration and visual customization options. UAD Console offers a more visually engaging experience with its detailed meters and customizable layouts. Steinberg’s Cubase, on the other hand, integrates seamlessly with its DAW, offering a more holistic workflow. Focusrite Control, while functional, feels more isolated, requiring more switching between applications.
In contrast to these competitors, Focusrite Control prioritizes simplicity and ease of use over extensive features and deep customization. This is a trade-off that caters well to beginners but might leave advanced users wanting more.
Suggestions for UI Improvement
Several improvements could enhance the intuitiveness of Focusrite Control. Adding customizable metering options, allowing users to select between different meter types (peak, RMS, etc.) and display modes, would be a significant enhancement. Similarly, providing more visual feedback during critical processes like latency compensation or buffer size changes would improve the user experience. Implementing a more robust preset management system, allowing users to save and recall custom configurations, would increase workflow efficiency.
Finally, considering a more modular layout that allows users to customize the interface by adding or removing sections based on their needs would cater to a wider range of users.
Mixing and Monitoring Features
Focusrite Control offers a robust set of mixing and monitoring options, allowing for precise control over your audio signal path. This goes beyond simple input level adjustments; it provides the tools for crafting detailed monitor mixes tailored to your specific needs, whether you’re tracking, mixing, or simply listening to music. This functionality is crucial for both professional and amateur musicians and producers alike, enhancing workflow and improving overall sound quality.
The software allows for independent control of each input’s level, pan, and routing. This means you can create custom monitor mixes, sending different signals to different outputs. For example, you might send your vocals to one set of headphones, your backing track to another, and a click track to a third. This level of control prevents unwanted bleed and allows for precise monitoring of specific elements in your production.
Individual Input Control
Focusrite Control provides individual faders for each input channel. These faders control the gain of each input before it reaches your DAW or other output devices. This granular control lets you adjust the volume of each instrument or vocal individually, optimizing your listening experience and preventing clipping. In addition to the fader, each input channel has a dedicated pan control, allowing you to adjust the stereo position of each instrument or vocal.
This is especially useful for creating a wide stereo image or isolating specific instruments in your mix.
Custom Monitor Mix Creation
Setting up a custom monitor mix is straightforward. First, select the output you want to send your monitor mix to. This could be a pair of headphones, studio monitors, or another audio interface output. Then, adjust the individual input faders and pan controls to achieve the desired balance. You can also use the built-in metering to ensure that your levels are appropriate and prevent clipping.
- Select Output: In Focusrite Control, choose the output destination (e.g., Headphones 1, Monitors). This directs your custom mix to the selected hardware output.
- Adjust Input Levels: Use the faders for each input channel to set the desired volume. For instance, you might lower the backing track slightly to better hear your vocals during tracking.
- Panning: Use the pan control to adjust the stereo position of each instrument. For example, you might pan a guitar slightly to the left and a keyboard slightly to the right for a wider stereo image.
- Monitor Metering: Use the built-in metering to check your output levels and prevent clipping. The meters visually indicate the signal strength, preventing unwanted distortion.
- Save (Optional): Some Focusrite interfaces allow saving custom monitor mix configurations for quick recall later.
Hardware Monitoring Options, Focusrite control
Focusrite Control also integrates with the hardware’s monitoring features, offering direct monitoring options. Direct monitoring sends the input signal directly to your headphones or monitors without going through your computer, reducing latency. This is particularly useful when tracking instruments or vocals as it allows for a more natural and responsive playing experience. The precise method of activating direct monitoring varies slightly between Focusrite interface models, but it’s usually a simple button press or software toggle.
The software often provides visual feedback to confirm that direct monitoring is enabled.
Effects and Processing Capabilities
Focusrite Control’s built-in effects, while not aiming to replace dedicated high-end plugins, offer a surprisingly robust and convenient suite for quick adjustments and creative processing directly within the DAW’s workflow. They’re especially handy for streamlining tasks during recording and initial mixing, saving you the step of loading and configuring external plugins. This integration directly within Focusrite Control adds a layer of efficiency that many users find invaluable.Focusrite Control’s effects are generally well-regarded for their ease of use and decent sound quality, particularly considering their integrated nature.
They aren’t going to replace your meticulously crafted Waves plugins for a professional-grade mastering session, but for basic EQ, compression, reverb, and delay, they often suffice. The effects are designed for speed and simplicity, making them ideal for live recording situations or quick fixes during tracking.
Built-in Effects and Genre Applications
The selection of effects included in Focusrite Control varies depending on the specific interface model, but generally includes EQ, compression, reverb, and delay. These are workhorse effects applicable across a wide range of genres. For example, a subtle EQ boost in the high-mids can add clarity to vocals in pop music, while a heavier compression might be used to tame a particularly aggressive guitar tone in metal.
Reverb can create a sense of space in acoustic recordings (think folk or singer-songwriter styles) or add depth to electronic music tracks. Delay can be used subtly to add width or more dramatically to create rhythmic echoes in genres like dub or electronic dance music (EDM).
Comparison to Other Popular Plugins
Compared to industry-standard plugins like those from Waves, Universal Audio, or FabFilter, Focusrite Control’s effects lack the depth of parameter control and often the nuanced sonic character. The Focusrite effects are more geared toward straightforward adjustments, while professional plugins provide more granular control over the processing chain. Think of it this way: Focusrite Control’s effects are like having a reliable Swiss Army knife – useful for many tasks, but not as specialized as individual tools.
A professional plugin, on the other hand, is like owning a finely crafted set of tools, each designed for a specific purpose. However, this simplicity is part of their appeal; they’re quick to implement and require minimal tweaking.
Workflow Example: Recording Acoustic Guitar
Let’s say we’re recording an acoustic guitar track for a folk song. We might start by using a gentle compression on the Focusrite Control to even out the dynamics, preventing any overly loud peaks. Then, we could apply a subtle EQ boost around 2-3kHz to add clarity and presence to the guitar’s tone. Finally, a touch of room reverb from the Focusrite Control’s built-in effects could be used to add a natural ambience to the recording, without overwhelming the original guitar sound.
This entire process can be completed within Focusrite Control without ever leaving the DAW, significantly streamlining the recording workflow.
Integration with DAWs
Focusrite Control’s seamless integration with your Digital Audio Workstation (DAW) is a key feature, streamlining your workflow and maximizing your audio interface’s potential. This integration allows for efficient control of your audio interface’s features directly within your DAW’s environment, minimizing the need to switch between applications. The level of integration varies depending on the specific DAW, but generally, it involves controlling aspects like monitoring, routing, and effects processing.Focusrite Control boasts robust integration with a wide range of popular DAWs, including Ableton Live, Logic Pro X, Pro Tools, Cubase, and Studio One.
These integrations typically involve either a dedicated plugin or direct control through the DAW’s preferences and settings. The methods used to achieve this integration differ slightly depending on the DAW, often utilizing specific communication protocols and APIs to ensure a stable and responsive connection.
DAW-Specific Integration Methods
The way Focusrite Control integrates with different DAWs varies slightly. For example, in Ableton Live, you might find dedicated controls within the preferences menu to manage your Focusrite interface’s settings. In contrast, Pro Tools might use a specific plugin that provides a visual representation of your interface’s routing and controls. Logic Pro X often offers a similar experience, integrating Focusrite’s hardware directly into its mixer environment.
This consistent yet tailored approach aims to make the integration feel intuitive within each DAW’s established workflow.
Compatibility Issues and Solutions
While generally well-integrated, occasional compatibility issues might arise. These could manifest as unexpected behavior, like incorrect routing, missing controls, or even complete failure to recognize the interface. Outdated drivers are a common culprit, often resolved by updating to the latest versions available on the Focusrite website. Conflicting software or hardware can also cause problems; troubleshooting might involve temporarily disabling other audio applications or devices to isolate the source of the conflict.
In rare cases, reinstalling Focusrite Control or the DAW itself might be necessary. Focusrite’s support website offers detailed troubleshooting guides and FAQs to address most common issues, and their customer support team is generally responsive and helpful.
Routing and Signal Flow
Focusrite Control offers flexible routing options that are key to shaping your audio signal path. Understanding how to manipulate these options is crucial for achieving the desired sound and workflow efficiency, whether you’re recording a single instrument or a full band. Proper routing allows for creative signal processing, precise monitoring, and streamlined recording sessions.Routing within Focusrite Control primarily involves directing audio signals from your inputs (microphone preamps, line inputs, etc.) to your outputs (monitors, headphones, DAW inputs).
This can be done directly, or you can route signals through various internal effects or processing units before sending them to your outputs. The software’s visual representation of your interface makes it easy to see the flow of audio. You can literally ‘draw’ your signal path, making it easy to troubleshoot and experiment. This visual aspect is a major plus, particularly for beginners.
Signal Routing Options
Focusrite Control allows you to route signals in several ways. Direct routing sends the signal from an input directly to an output. This is the simplest method, often used for monitoring a direct signal. Alternatively, you can route a signal through internal effects, such as compression or EQ, before sending it to an output. This is beneficial for shaping the sound of individual tracks during recording or monitoring.
Finally, you can route signals to different outputs simultaneously, allowing you to send a signal to both your monitors and headphones, for example, with independent volume control for each.
Best Practices for Efficient Signal Routing
Efficient signal routing is crucial for a smooth recording process. For a single instrument recording, direct monitoring is often sufficient, sending the signal directly from the preamp to your headphones or monitors. For more complex setups, using submixes can be incredibly helpful. A submix allows you to group several tracks together, apply processing to the group, and then send the processed signal to your DAW.
This is particularly useful when recording a drum kit, where you might group individual drum mics into a drum submix and then send that to your DAW. This reduces the number of individual tracks you need to manage in your DAW. For even larger projects, using aux sends and returns provides additional flexibility for effects routing and monitoring.
Careful planning and labeling of your tracks and buses are key to maintaining clarity and avoiding confusion.
Routing Configurations and Applications
| Routing Configuration | Input | Processing | Output |
|---|---|---|---|
| Direct Monitoring | Microphone Preamp | None | Headphones/Monitors |
| Internal Effects Routing | Guitar Input | Amp Simulator, EQ | DAW Input |
| Submix Routing (Drums) | Multiple Mic Inputs (Snare, Kick, Toms) | Compressor, Gate | DAW Input |
| Aux Send/Return (Reverb) | Vocal Mic | Reverb (external or plugin) | DAW Input, Monitors |
Advanced Features and Functionality

Focusrite Control, beyond its core mixing and monitoring capabilities, packs some seriously powerful advanced features that can significantly boost your workflow and creative output. These features go beyond the basics, allowing for deeper integration with your DAW and a more streamlined, efficient recording process. We’ll dive into a few key features and see how they can be leveraged to enhance your recordings.
The advanced features in Focusrite Control aren’t just bells and whistles; they’re tools that can dramatically improve your workflow. By understanding and utilizing these features, you can save time, improve accuracy, and ultimately create better-sounding mixes. This section will highlight some of these advanced features and provide practical examples of their application.
MIDI Control
Focusrite Control supports MIDI control, allowing you to remotely control various aspects of your audio interface directly from your DAW or a MIDI controller. This means you can automate tasks like changing gain levels, selecting inputs, or even routing signals—all without ever touching your interface. Imagine seamlessly automating a fader’s movement throughout a song to create dynamic changes in the mix.
Or consider using a footswitch to trigger a cue mix during live performances. The possibilities are quite extensive.
Automation
Focusrite Control’s automation capabilities allow for the control and modification of various parameters over time. This could involve automating the levels of your inputs, the routing of your signals, or even the settings of onboard effects. By automating these processes, you can create dynamic and evolving soundscapes within your recordings, adding a level of sophistication and nuance often difficult to achieve manually.
For example, you could automate the panning of a vocal track to create a more spacious and interesting stereo image.
Customizable Control Surfaces
Focusrite Control allows you to create custom control surfaces tailored to your specific workflow. This means you can map your preferred controls to easily accessible locations on your screen, streamlining your mixing and monitoring process. For instance, if you frequently use a specific EQ setting, you can map it to a dedicated button or knob for quick access.
This customization significantly reduces the time spent navigating menus, allowing for a more intuitive and efficient recording session.
Workflow Example: Using Three Advanced Features
Let’s imagine we’re recording a song with a complex arrangement. We’ll utilize MIDI control, automation, and customizable control surfaces to enhance the recording process.
First, we set up a custom control surface in Focusrite Control, placing frequently used controls like the main output volume and monitor mix balance in easily accessible locations. Then, using a MIDI controller, we automate the input gain of a guitar track during a solo, gradually increasing the level for a dramatic effect. Simultaneously, we use automation within Focusrite Control to subtly adjust the panning of the vocal track throughout the chorus, creating a wider stereo image.
Finally, we utilize the custom control surface to quickly adjust the monitor mix balance, ensuring the balance between the instruments and the vocals remains consistent throughout the song.
Troubleshooting Common Problems
Okay, so you’ve got your Focusrite interface all set up, but something’s not quite right. Don’t panic! Most Focusrite Control issues are easily solved with a little troubleshooting. This section will walk you through some common problems and their solutions. We’ll cover everything from simple connection issues to more complex driver problems.Let’s dive into some common issues and how to fix them.
Remember to always check the Focusrite website for the latest drivers and troubleshooting guides specific to your interface model.
Driver Issues and Installation Problems
Driver problems are a common source of frustration. Incorrectly installed or outdated drivers can lead to audio dropouts, latency issues, or your interface not being recognized by your computer. First, make sure you’re downloading the correct driver from the Focusrite website for your operating system (Windows or macOS) and specific interface model. Then, uninstall any existing drivers before installing the new ones.
A clean install is usually the best approach. If problems persist after a clean install, consider restarting your computer. If the problem continues, check your computer’s device manager (Windows) or System Information (macOS) to ensure the interface is correctly recognized and there are no driver conflicts. If you’re still having trouble, contact Focusrite support – they’re usually pretty helpful!
Audio Dropouts and Latency
Experiencing audio dropouts or high latency (delay) can be super annoying. Several things can cause this. First, check your buffer size settings within Focusrite Control. A smaller buffer size reduces latency but increases the processing load on your computer, potentially leading to dropouts. Experiment with different buffer sizes to find the optimal balance for your system.
Also, ensure that no other applications are heavily using your computer’s processing power while you’re recording or mixing. Close unnecessary programs to free up resources. Another potential culprit is a faulty USB cable or a poorly powered USB port. Try a different USB cable and a different port – ideally a port directly connected to your computer’s motherboard rather than a USB hub.
If the problem persists, it could be related to driver issues (see above) or a problem with your audio interface itself.
Interface Not Recognized
If your computer isn’t recognizing your Focusrite interface, several steps can help. First, ensure the interface is correctly connected to your computer via a functioning USB cable. Try different USB ports, including those directly connected to your motherboard. Check that the interface is powered on and that there are no visible physical damage to the USB port on either your computer or the interface.
If it still isn’t recognized, try restarting your computer. Next, check your computer’s device manager (Windows) or System Information (macOS) for any error messages related to the interface. This will provide more specific clues about the problem. If the interface is still not recognized, it might be a hardware issue, requiring you to contact Focusrite support or seek professional repair.
Common Errors and Solutions
Here’s a quick list of common errors and their solutions:
- Error: Interface not detected. Solution: Check USB connections, restart computer, reinstall drivers.
- Error: Audio dropouts. Solution: Adjust buffer size in Focusrite Control, close unnecessary applications, check USB cable and port.
- Error: High latency. Solution: Adjust buffer size in Focusrite Control, close unnecessary applications, check drivers.
- Error: Driver installation failed. Solution: Download latest drivers from Focusrite website, uninstall old drivers before installing new ones.
- Error: No sound from outputs. Solution: Check routing in Focusrite Control, ensure correct output selection in your DAW, check volume levels.
Remember, consulting the Focusrite support website and user manuals specific to your interface model is always a good idea for more detailed troubleshooting steps.
Hardware Compatibility
Focusrite Control’s compatibility is a key factor in its overall usability. It’s designed to work seamlessly with a range of Focusrite audio interfaces, offering a unified control experience. However, its functionality is inherently limited when used with non-Focusrite hardware. Understanding these compatibilities and limitations is crucial for a smooth workflow.Focusrite Control is primarily designed to manage and control Focusrite audio interfaces.
This means that features like mixer control, monitoring routing, and effects processing are optimized for these devices. While some basic functionalities might work with other interfaces, full integration and access to advanced features are not guaranteed. Attempting to use Focusrite Control with unsupported hardware may result in unexpected behavior or even software instability.
Focusrite Interface Compatibility
Focusrite Control boasts broad compatibility across the majority of their modern audio interfaces. Generally, any interface released within the last decade will integrate smoothly. Specific compatibility is often detailed on the Focusrite website and within the Focusrite Control software itself, often during the initial setup process. Older interfaces may require specific driver versions or may have limited feature support.
Always check the Focusrite website for the most up-to-date compatibility information before connecting your hardware.
Limitations with Non-Focusrite Hardware
Using Focusrite Control with non-Focusrite hardware is generally not recommended and may not work at all. The software is specifically tailored to interact with the drivers and hardware protocols of Focusrite interfaces. Attempting to use it with other brands’ interfaces will likely result in the software failing to recognize the hardware, preventing access to its core functionalities. In some rare cases, minimal functionality, such as basic level control, might be possible, but this is not guaranteed and should not be relied upon.
It’s best practice to stick with the intended hardware for optimal performance and reliability.
Supported and Unsupported Hardware
| Supported Hardware | Unsupported Hardware |
|---|---|
| Focusrite Scarlett series (2i2, 2i4, 18i8, etc.) | Most non-Focusrite audio interfaces (e.g., Universal Audio, PreSonus, MOTU) |
| Focusrite Clarett series (2Pre, 4Pre, 8Pre, etc.) | Generic USB audio devices (e.g., built-in laptop microphones) |
| Focusrite Red series (Red 8Pre, Red 16Line, etc.) | MIDI controllers (unless specifically designed for integration with Focusrite interfaces) |
| Focusrite Saffire series (though support may be limited depending on the model and driver version) | Analog mixers (Focusrite Control is a software solution) |
Updates and Future Developments

Focusrite regularly releases updates for Focusrite Control, aiming to enhance performance, stability, and add new features based on user feedback and technological advancements. These updates are crucial for maintaining compatibility with the latest operating systems and DAWs, ensuring a smooth and efficient workflow for users. The frequency and specifics of updates vary, but generally, you can expect several updates annually, some minor bug fixes, and others introducing more substantial improvements.Focusrite’s future development plans for Focusrite Control are likely to center around expanding its functionality and integration capabilities.
This could involve improvements to the user interface for better intuitiveness, more robust control over advanced features, and deeper integration with other popular music production software and hardware. We can expect to see Focusrite actively seeking user input to guide their development roadmap.
Software Update Frequency and Content
Focusrite typically releases updates several times a year, sometimes more frequently to address critical bugs or security vulnerabilities. These updates often include improvements to the software’s stability and performance, as well as new features based on user requests and market trends. For example, a recent update might have focused on improving latency performance for certain audio interfaces, while another might have introduced support for a new DAW or plugin format.
The release notes accompanying each update provide details on the specific changes and improvements.
Planned Feature Enhancements
Future development might include enhanced routing options within Focusrite Control, allowing for more complex signal flows and custom configurations. This could also involve improved metering and visualization tools, offering users more precise control over their audio levels and signal paths. Integration with cloud-based services for backup and collaboration is another potential area of development, mirroring similar trends in other music production software.
Imagine being able to easily share your mixer settings and presets with collaborators online. Another likely enhancement could be an improved plugin management system within Focusrite Control, simplifying the process of browsing, installing, and updating plugins.
Potential for New Features
The potential for new features is extensive. Focusrite could explore incorporating advanced features like AI-powered mixing assistants, offering suggestions for EQ, compression, and other mixing parameters. They might also integrate advanced metering tools, providing more detailed insights into the audio signal, such as spectral analysis and phase correlation. Furthermore, we might see enhanced support for immersive audio formats like Dolby Atmos, reflecting the growing demand for spatial audio in music production.
The introduction of MIDI control capabilities within Focusrite Control, allowing for deeper hardware integration and automation, is also a plausible development.
Illustrative Example of a Recording Session
Let’s walk through a typical recording session using a Focusrite Scarlett interface and Focusrite Control, focusing on capturing a simple acoustic guitar track. This example highlights the power and ease of use of Focusrite Control in a practical scenario. We’ll cover setup, recording, and basic mixing.
Our goal is to record a clean acoustic guitar performance, then add a touch of reverb to enhance the sound. We’ll use Focusrite Control to monitor the signal, adjust gain, and apply the reverb effect in real-time.
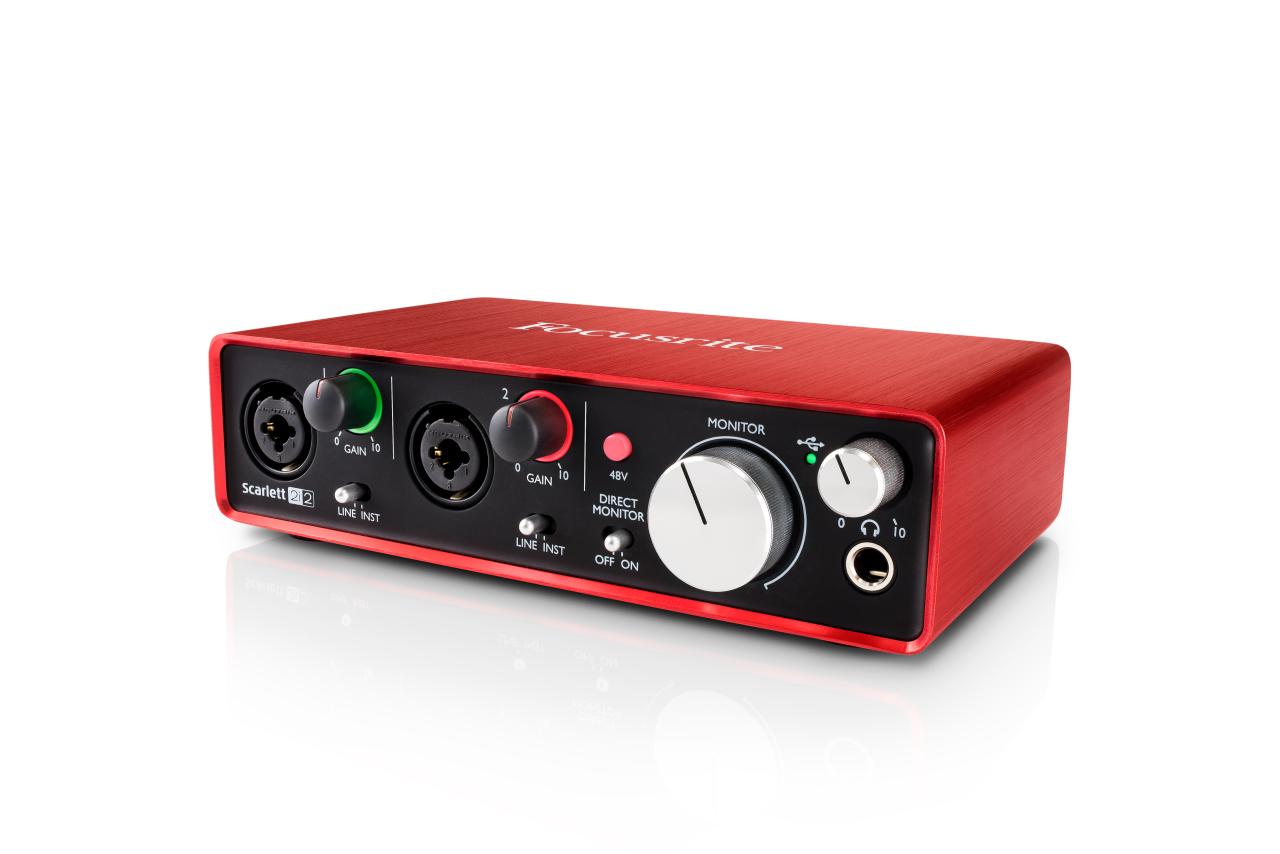
Recording Setup and Hardware Configuration
First, we connect our acoustic guitar to the Focusrite Scarlett interface using a high-quality XLR cable. We choose Input 1 on the interface. We then open Focusrite Control and check that Input 1 is selected and armed for recording. We adjust the gain using the Focusrite Control interface’s intuitive visual meter, ensuring we achieve a strong signal without clipping (distortion).
We set the sample rate and buffer size within Focusrite Control to optimize performance based on our computer’s processing power and the desired latency. We’ll select 44.1kHz and a buffer size of 256 samples as a good starting point. The Focusrite Control software displays this information clearly, making it easy to manage.
Signal Flow and Monitoring
The signal flow is straightforward: Acoustic Guitar -> XLR Cable -> Focusrite Scarlett Input 1 -> Focusrite Control (monitoring and processing) -> DAW (Digital Audio Workstation).
So, Focusrite Control is awesome for tweaking your audio interface settings, right? But what if you’re recording on the go and don’t have access to your desktop? That’s where something like garageband android could come in handy for quick mobile projects. Then, once you’re back at your desk, you can fine-tune everything with Focusrite Control for that polished final mix.
We use Focusrite Control’s direct monitoring feature to hear the guitar signal with minimal latency. This allows us to perform and adjust the guitar’s sound in real-time, before it even hits the DAW. We carefully balance the direct monitor level to avoid any unwanted feedback or loudness issues. The visual metering within Focusrite Control provides real-time feedback on the signal level to help us manage this effectively.
Applying Effects in Real-Time
Before recording, we add a touch of reverb using the built-in Focusrite Control effects. We select a reverb preset that complements the acoustic guitar’s sound, adjusting the wet/dry mix to taste. This adds depth and ambience without overwhelming the natural sound of the instrument. The Focusrite Control interface’s intuitive graphical representation of the effect allows for precise adjustments.
Recording the Performance
Once the setup is complete and the monitoring sounds good, we start recording within our DAW. We play the acoustic guitar part, carefully monitoring the levels within Focusrite Control. We make sure the signal remains strong but avoids clipping. Focusrite Control’s real-time visual feedback is crucial for avoiding issues during recording.
Mixing and Post-Processing
After recording, we import the track into our DAW. We might make subtle adjustments to the gain staging, but because we used Focusrite Control effectively during the recording process, this step is minimal. We might also add further processing in our DAW such as EQ or compression, but the core sound is already well-captured thanks to our pre-recording work with Focusrite Control.
Closing Summary
So there you have it – a comprehensive look at Focusrite Control. From its intuitive interface to its powerful routing and effects, this software is a game-changer for anyone serious about audio production. Mastering Focusrite Control isn’t just about knowing the buttons; it’s about understanding how its features work together to create a seamless and efficient workflow. So fire up your DAW, connect your interface, and start experimenting – you’ll be amazed at what you can achieve.
Q&A
Can I use Focusrite Control with non-Focusrite interfaces?
Nope, Focusrite Control is specifically designed for Focusrite audio interfaces. It won’t work with other brands.
Does Focusrite Control have a built-in limiter?
No, it doesn’t have a built-in limiter, but you can easily route your signal to a limiter plugin within your DAW.
How often do I need to update Focusrite Control?
Focusrite usually releases updates periodically to fix bugs and add features. Check their website for the latest version.
What happens if I lose my Focusrite Control license?
Contact Focusrite support; they can usually help you recover your license or provide a replacement.
Can I use Focusrite Control on a Mac and PC?
Yes, Focusrite Control is available for both macOS and Windows.